Iris

Irises are the cornerstone of my May garden. Because of their diverse forms, color range and bloom times, Irises can be used multiple times in one garden without creating stagnate duplication. Their strong stems need no staking. And except for occasional dividing and deadheading their care is minimal. That is a pretty good track record for a plant so provocatively beautiful.

Though there are over 200 species and many more hybrids of Iris, I grow and design with three widely available types; Bearded Hybrid Iris, Siberian Iris, and Japanese Iris. These Irises grew in the formal perennial gardens at Temple University Ambler campus where I studied floriculture under the auspice of Viola Anders.

Miss Anders was the Julia Child of horticulture, tall and talented with that high-pitched voice that spoke of no nonsense gardening. The gardens were an amalgamation of her experiences gardening in England and gardening for a privileged clientele here in the states. We learned to design pastel gardens for a set of people who summered in Maine or on Nantucket using perennials that flowered from spring until the Fourth of July. Irises fell right into the mix. An Anders favorite was Iris x ‘Beverly Sills’, a beautiful pastel coral-pink Iris that took my breath away.

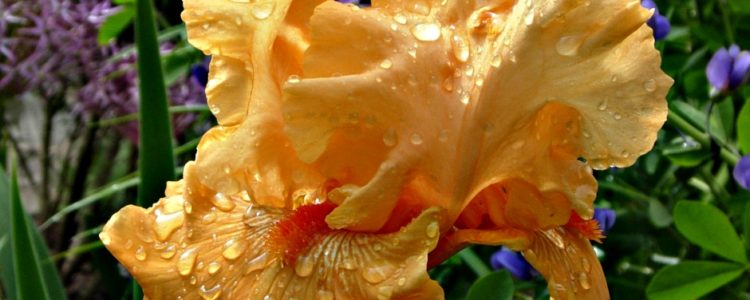
May begins with Bearded Iris. These are hybrids sometimes incorrectly listed as Iris germanica, which is actually a parent species used to breed some of the most remarkable, tall Bearded Irises. Bearded Iris is one of the most diverse groups of Iris. The American Iris Society has subdivided them by height. They range from the earliest flowering miniatures to the tall late spring Standards. The flowers are characterized by their bearded falls. Colors range from snowy white through every conceivable shade of single and multi-colored flowers. My favorite is a tall Bearded Iris sold as Orange Harvest. Actually a shade of apricot, it combines well with the blue Siberian Irises. Orange Harvest is a re-blooming Iris that presents us with a second flowering in late summer and early autumn. Other notable re-bloomers are: Immortality (white), Victoria Falls (bright blue), and Autumn Circus (white and purple bicolor).

Just as my apricot Breaded Irises produce their second flush of flowers, my stately Siberian Iris opens. Siberian Irises are one of the easiest and most dependable perennials to grow. These are a class of Iris regarded as “beardless”. They grow best in full sun but will tolerate partial shade. Their only care involves occasional division every 3 – 4 years. My favorite is Iris sibirica ‘Caesar’s Brother’. It has purple velvet flowers on strong 3 foot stems. Iris sibirica ‘Butter and Sugar’ is another good choice with creamy white and yellow flowers that re-bloom.

Japanese Irises, Iris ensata, bloom third in our sequence; early to mid June. They will tolerate a wet site and can be used in a rain garden. Their beardless, flat flowers appear to fly like aircraft on top of strong stems. Colors range from white to pale blues, lavender, and all shades of purple and magenta often with darker contrasting veins. If you can provide a bit of moisture, these are the Irises for you. My pick is Iris ensata ‘Flying Tiger’, 36 inches tall with pale violet-white flowers that have purple veins. Iris e. ‘Sensation’ runs close second, sporting large magenta flowers with yellow signals. A show stopper!

Even if you are not in the market for more garden plants, take a trip to your local perennial nursery or Iris farm. You will be fascinated by the diversity these low maintenance perennials can offer.

Eastern Redbud trees, Cercis canadensis, have been one of my favorite trees since 1981. That was the year I rented a cabin on an idyllic homestead in Tylersport. I traveled each day from my little cabin, crossed a trout stream, and then drove to Warminster. There I worked as horticulturist for W. Atlee Burpee Seed Company, in a windowless building with cinderblock walls. My boss greeted me every morning with a “hello darling!” while she blew a big puff of smoke into my face and critiqued the typing errors I made with a sticky-keyed typewriter answering customers’ letters.

Coming home in spring was like falling down the rabbit hole. I drove across the trout steam, traversed around a diabase boulder the size of a Volkswagen Beetle, and was swallowed by a world of natural beauty magnified by ten because of where I had just come from. Redbuds, Dogwoods and Virginia Bluebells peppered the woodland.

Eastern Redbuds are native trees found from Massachusetts to northern Florida. Their magenta flowers and dark bark are unrivaled for spring exuberance. Redbuds prefer full sun to light shade, are adaptable to most soil types, but will thrive in well-drained deep soil. They do best when transplanted as a young and dormant tree. There are many cultivar selections available for you to pick from, such as ‘Forest Pansy’ with purple foliage, ‘Appalachian Red’ with its neon pink flowers, and even a few white varieties…but why when the native tree speaks volumes all by itself?

With an ultimate size of 20 to 30 feet high by 25 to 35 feet wide, Redbuds fit into almost any garden. Native Dogwoods bloom the same time as Redbuds. The white Dogwoods and chartreuse spring canopy work like Prozac to calm down the explosion of color and create an impressionistic landscape. This natural plant combination translates into many of my garden designs today.

Virginia Bluebell, Mertensia virginica, is my favorite spring ephemeral. It covers low lying woodlands with a blue haze of color in April. It cheers on spring in our perennial gardens, and makes a perfect companion for my pink Narcissus. And then, like all good ephemerals, Mertensia goes dormant with little a trace by summer.

We are accustomed to seeing drifts of wildflowers come and go in the woodland but a midsummer void in the flower garden may not be as appreciated. Alas, there is a simple solution. Interplant Virginia Bluebells with late emerging perennials. My Mertensia coexist in a shade garden with hardy Begonia grandis. It is a mutual love affair. The Bluebells will go dormant just as the Begonias finally show us their leaves. The Bluebells mark the place where the Begonias will emerge and keeps busy gardeners from disturbing the delicate root systems. Likewise, the Begonias soon cover the yellowing Bluebell foliage and keep a low maintenance garden in flower until frost.

Other late emerging perennials you might want to partner Bluebells with include: Leadwort (Ceratostigma plumbaginoides) and Ferns for shade and Balloon Flower (Platycodon grandiflorus), Butterfly Weed (Asclepias tuberosa), False Indigo (Baptisia australis) and Hardy Hibiscus for sunny gardens.

Bluebells grow 1 ½ to 2 feet tall, prefer shade to part shade light, and thrive in moist, loamy soil though my Mertensia only get necessary hand watering are in a part shade to sunny location, and do just fine. They are native throughout the mid west and east coast of the U.S. and parts of Canada. They will reseed like gentlemen and not like noxious weeds so I tip my hat to their self restraint. Hardy Begonias mimic this behavior and so they are a cherished and welcomed immigrant. If you have ever tried growing plants in the neighborhood of a Black Walnut tree you would know what a tiresome task it is to find plants tolerant of the toxic Juglone root system. Both Bluebells and Hardy Begonias will grow here.

If this sounds too good to believe, believe it. Virginia Bluebells are the perfect native plant to add to your garden or woodland.

Bright biennial pansies can give months of enjoyment during cool weather before the abundance of warm weather annuals are marketed for the garden. Even if you do not have room to add pansies to your garden, a pansy wreath can make a colourful addition to your door or table top.

HERE IS WHAT YOU NEED TO GET STARTED:

1. A wire Living Wreath Ring and liner kit

2. A good light potting soil

3. Scissors and Plyers

4. A flat of small pansy plants (48 or 36 per flat)

5. A trash can lid, wheel barrow or other container to hold water for soaking the wreath

Insert the liner into the concave wreath form. Sprinkle the liner with water and slightly moisten the potting soil so it holds together when you squeeze it in your hand but does not drip water. Fill the liner about 2/3 full with the moist potting soil.

Lightly moisten the bottom liner and place the flat wire wreath form on top being careful to tuck the bottom liner’s edges inside. With your plyers, bend the side wires around the bottom wreath form.

Turn over the wreath. It will not be completely filled with soil to allow room for the pansy roots.

Cut an X with your scissors into one of the inner sections and open it slightly so it is just wide enough to insert a pansy.

Insert a pansy and continue adding pansies around the interior sections of the wreath. When finished the inner sections add pansies to the outside sections of the wreath. You might want to line up your pansies by color and rotate them as you work around the wreath.

After you completely fill in each section, remove any old leaves and flowers with your scissors. Place your wreath in a container such as a trash can lid or wheel barrow and add water to just below the flowers. Let the wreath soak up water for about an hour until the soil feels wet. Then empty the container of water and allow the pansies to root for about 5 – 10 days on a flat surface in the sun. Moisten if necessary.

Hang the wreath over a wreath hook on your door or place it in a plastic saucer on an outdoor table in a sunny spot.

Check the wreath for moisture and sprinkle with a hose for place it in a shallow container of water to moisten. Remove old flowers, leaves and seed heads to keep your wreath fresh. As hot weather approaches the pansies will beome long and spindly. You can remove the pansies and replant the wire form with warm weather annuals such as Impatiens.

Wire wreath forms are available at garden centers and on line. Directions with my wreath form suggested planting on the flat side of the wreath but I find leaving the flat side unplanted works better against a door.

On this first day of spring a cold wind blows through the garden and snow flurries hold onto a season best forgotten. And still the Snowdrop and the Hellebore push forth to defy the cold.

While the Snowdrop’s flower season will be cut short the Hellebore blooms on through May, holding onto its spent sepals which are leaves that look like flowers. Helleborus is a genus containing 20+ varieties and even more hybrids. My favorites have always been Helleborus orientalis, the Lenten Rose, called this because it flowers during the season of lent. Helleborus orientalis loves to hybridize with other species creating a mixture of “flower” colors ranging from off-whites and pale greens to pinks and maroons. Today’s new hybrids and strains of Hellebores offer beautiful variants within and without the color range, often with interesting speckled faces. The leaves are a glossy dark green standing 12 – 18 inches tall all summer into winter. It is a long lived perennial hardy in zones 3 – 10, prefers shade and is very deer resistant. My Hellebores are planted in a garden bed under a Witchhazel that flowers yellow January through March. Chartreuse Hosta and Tradescantia ‘Sweet Kate’ keep this shady bed low maintenance and vibrant the rest of the year. Locate your early flowering perennials and shrubs where you can enjoy them all season without walking across the wet garden. Mine are next to the driveway, just outside my kitchen window.

Onion Snow

“Onion snow” is one of those Pennsylvania Dutch phrases my grandfather used to describe a late snow, after the first day of spring. Like today, March 25th, the onion snow came just about the time for him to plant onions. In his case, he planted onion sets bought at our local farm bureau.

Onion growers have a whole host of onions types and growing methods available to them. There are short-day, long-day and day-neutral varieties. Long-day varieties are for northern gardens and short-day varieties for southern. All this has to do with the number of hours of daylight a variety needs in order to start growing the onion bulb. Sweet Spanish and Walla Walla onions are long day varieties whereas; Vidalia and Bermuda onions are short day types. If you plant a short-day onion in the north you will have much smaller onions. This is perfect for producing pearl onions or pickling onions just the right size for a canning jar. Sweet onion varieties mature earlier than keeper varieties. Keepers or storing onions tend to be more pungent, like Yellow Ebenezer.

Onions have a long growing season, so growing them from onion sets or onion plants is a great time saving option. If you have the time, the place and sense of adventure you might try growing onions from seeds. The best onions I ever grew were from seed I started in a hobby greenhouse. You will need to order your seeds early so they can be planted in mid to late January. Sow them in rows in a seed tray filled with light potting soil. Keep moist and in a sunny window, greenhouse or under lights. The plants will emerge in about 2 weeks. As they grow you can thin out and transplant seedlings so they are about an inch apart. I kept my plants trimmed with a scissors to about 4 inches tall. This made for nice thick transplants in April.

Probably the most important element for good onion production is a loose, granular soil and plenty of good organic fertilizer. The year I grew my best onions I had just started as head horticulturist at the Andalusia Foundation. Andalusia is located just north of Philadelphia on the Delaware River. I expanded the meager vegetable plot to a ¼ acre productive garden. A local dairy farmer supplied us with fresh manure in late fall that sat on the garden and decayed until spring. This, added to the already alluvial river soil, made for the perfect growing medium. You can create an excellent garden soil with compost in raised beds that will do the trick nicely. The entire vegetable garden was a great success but the softball sized Spanish onions were my pride and joy.